Selectric Resources
TABULATION (NRB/S) ADJUSTMENTS
1. Tab Rack Radially —
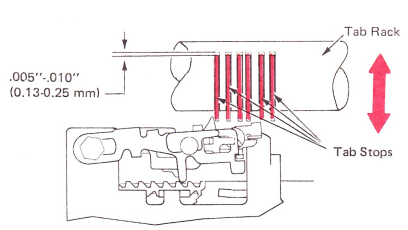
a. Position all the tab stops (except the final stop) to the rear of their slots to get .005”-.010” (0.13-0.25 mm) between the stops and tab rack.
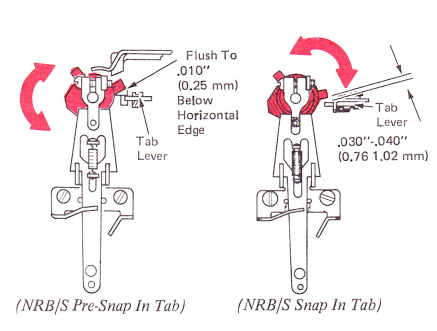
b. Latch out the tab lever. Rotate the tab rack within the tab set and clear bellcrank for .030”-.040” (0.76-1.02 mm) between the tab stops and the tab lever pawl.
2. Tab Lever Stop — Form the stop front-to-rear for a clearance of .001”-.003” (0.03-0.08 mm) between the vertical lug on the tab lever and the backspace pawl when the pawl is bottomed in its rack.
NOTE: Make sure all escapement bracket and print escapement adjustments are correct before forming this stop.

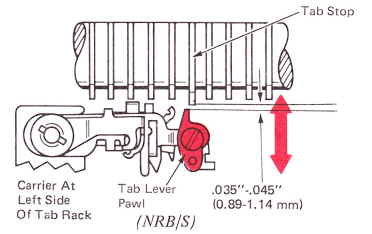
3. Tab Lever Pawl — Adjust the tab lever pawl front to rear for .035”-.045”(0.89-1.14 mm) clearance between the tip of the tab lever pawl at rest and the set tab stops. Make this adjustment with the carrier at the left side of the tab rack. The adjustment of the tab lever pawl has an effect on the amount of overlap between the tab stop and the pawl tip in the active position.
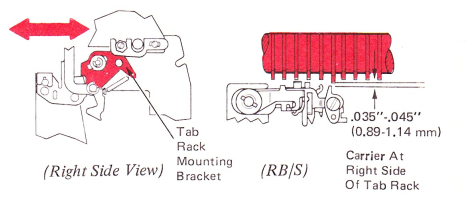
4. Tab Rack Parallel — Adjust the tab rack mounting bracket front to rear to get .035”-.045” (0.89-1.14 mm) clearance between the tip of the tab lever pawl at rest and the set tab stops. Make this adjustment with the carrier at the right side of the tab rack.
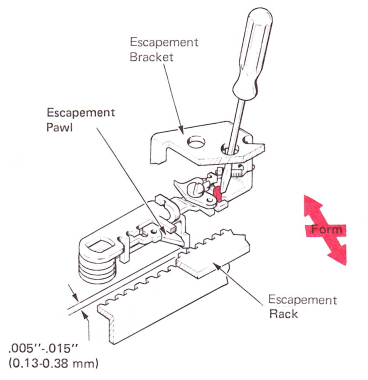
5. Pawl Clearance — Form the lug on the tab latch for a clearance of .005”-.015” (0.13-0.38 mm) between the tip of the escapement pawl and escapement rack teeth, with the tab lever latched to the rear. This adjustment ensures that the escapement pawl will enter the rack as quickly as possible to reduce the possibility of entering the wrong tooth.
The lug of the tab latch may be formed with the three-inch screwdriver by using it as a lever through the hole in the escapement bracket.
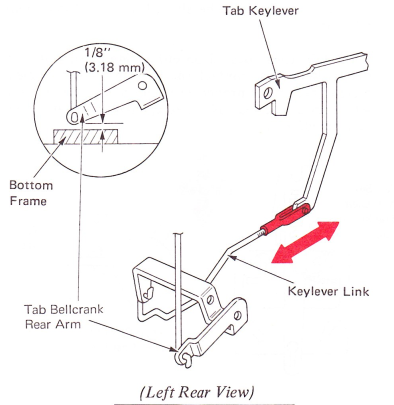
6. Keylever Link - Adjust the link on the tab keylever extension so that the rear arm link of the tab bellcrank rests approximately 1/8” (3.18 mm) above the bottom frame.
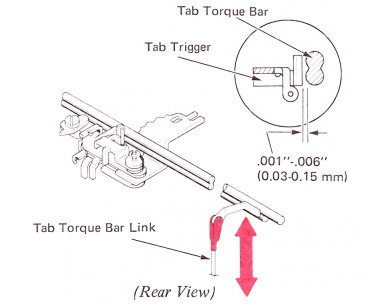
7. Tab Torque Bar Link — Adjust the tab torque bar link for a clearance of .001”-.006” (0.03-0.15 mm) between the tab torque bar and the tab lever trigger at rest.
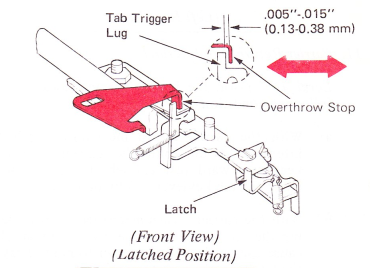
8. Tab Lever Overthrow Stop (Level 1) — Adjust the tab lever overthrow stop fron or rear so that .005”-.015” (0.13-0.38 mm) clearance exists between the lug of the tab lever trigger and the overthrow stop when the tab lever is latched to the rear.
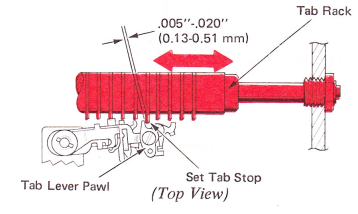
9. Tab Rack Left To Right — Adjust the tab rack left to right for .005”-.020” (0.13-0.51 mm) clearance between the tip of the tab lever pawl and the left side of a set tab stop.
To make this adjustment, clear all the tab stops. Set one tab stop, backspace one time, and then turn the machine off. The tip of the tab lever pawl should be just to the left of the tab stop. Hold the carrier to prevent it from moving, and observe the tab lever pawl as you slowly depress the tab keybutton. The tip of the tab lever pawl should clear the left side of the tab stop by .005”-.020” (0.13-0.51 mm)
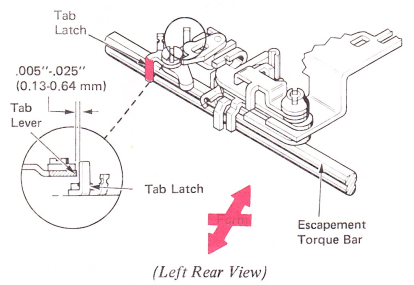
10. Tab Interlock — Form the lug on the tab latch that extends down behind the escapement torque bar so that the escapement torque bar rotates the tab latch away from the tab lever by .005”-.025" (0.13-0.64 mm). Make this adjustment with the carrier return clutch latched.
The adjustment ensures that the carrier return and tab cannot both be latched out at the same time. If both were allowed to latch, the tab lever pawl would lock against a set tab stop during the carrier return operation.
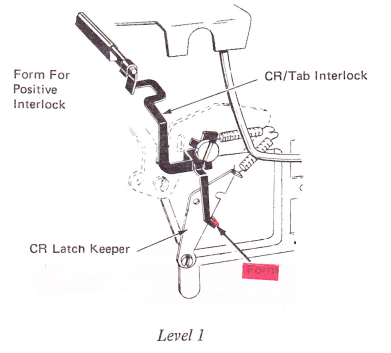
11. Carrier Return/Tab Interlock —
Level 1 — Form the lug on the interlock to get the following conditions:
a. With the carrier return mechanism latched, the interlock should pull the carrier return latch keeper forward just enough to release the latch when the tab keylever is fully depressed.
b. With the carrier return mechanism at rest, depressing the tab keylever all the way down should not cause the carrier return keeper to move away from the latch (level 1 only).
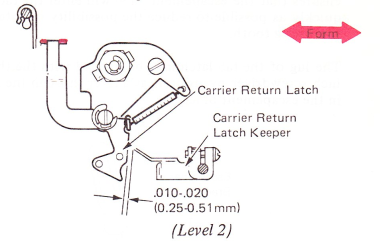
Level 2 — With the tab keybutton held down, form the horizontal arm part of the carrier return interlock to get .010”-.020” (0.25-0.51 mm) between the carrier return latch and keeper.
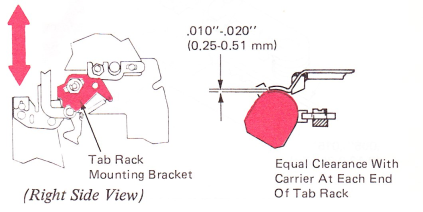
12. Tab Rack Vertical — Adjust the tab rack mounting bracket up or down to get .010”-.020”(0.25-0.51 mm) clearance between the tab rack and the tab clear finger. Check for this condition with the carrier at each end of the tab rack.
NOTE: Check to make sure the tab rack left-to-right
and tab rack parallel adjustments are correct after
making this adjustment.
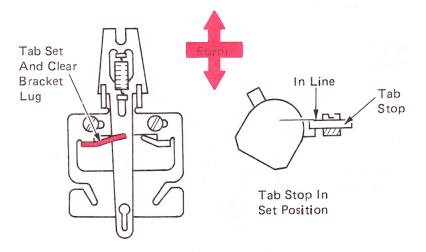
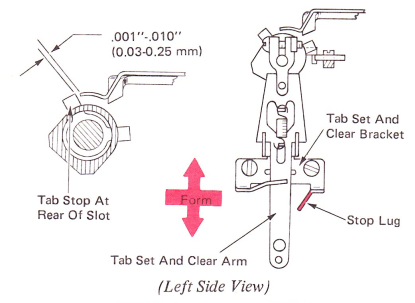
13. Tab Set Lug — Form the stop lug on the tab set and clear bracket so that when a tab stop is set, the top of the tab lever pawl will be aligned with the top of a set tab stop.
If the tab stops, located on either side of the tab stop that is being set, contact the bottom of the tab clear bracket before the proper set position is gotten, the tab set finger at the rear of the escapement bracket should be formed down.
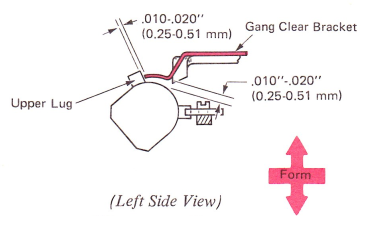
14. Gang Clear Bracket — The gang clear bracket should be adjusted front-to-rear for .010”-.020” (0.25-0.51 mm) clearance with the clear lug of a set tab stop. The clear bracket should be formed up or down for .010”-.020” (0.25-0.51 mm) clearance with the tab rack.
15. Tab Clear Lug — With the tab stops at the rear of their slots, form the stop lug so that the gang clear bracket will clear the upper lug on the tab stop by .001"-.010” (0.03-0.25 mm) when the tab clear is operated.
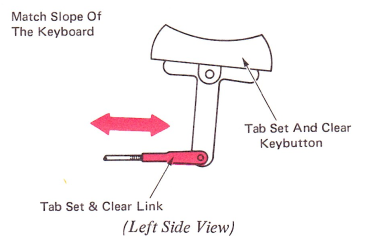
16. Tab Set And Clear Link — Adjust the tab set and clear link so the tab set and clear keybutton matches the angle of the keyboard.
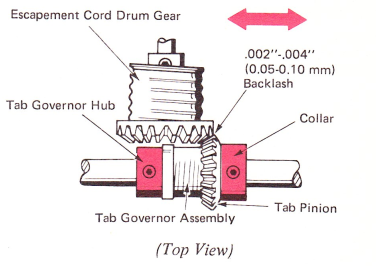
17. Tab Pinion Backlash — Adjust the tab governor assembly left or right to get .002”-.004” (0.05-0.10 mm) backlash between the tab pinion and the escapement cord drum gear. The pinion should have a minimum of end play between the tab governor hub and collar, yet still rotate freely. Check adjustment with power on.