Selectric Resources
FUNCTIONAL CHECK — IBM ”SELECTRIC" TYPEWRITER
This functional check is a procedure that is used to determine whether or not an IBM “Selectric” Typewriter has any malfunctions. It includes checks of every function of the machine.
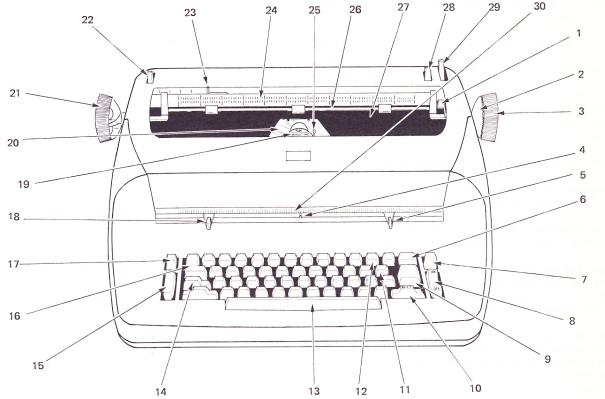
1. Detent Release Lever |
12. Hyphen/Underscore Key |
23. Paper Guide |
2. Page End Indicator |
13. Spacebar |
24. Copy Guide Scale |
3. Platen Knob |
14. Shift Lock |
25. Impression Control Lever |
4. Position Indicator (Carrier Pointer) |
15. Tab Set And Clear |
26. Paper Bail |
5. Right Margin Stop |
16. Tab Key |
27. Platen |
6. Backspace Key |
17. Margin Release Lever |
28. Line Space Lever |
7. Index Key |
18. Left Margin Stop |
29. Paper Release Lever |
8. On/Off Switch |
19. Typing Element (Typehead) |
30. Front Scale |
9. Carrier Return Key |
20. Clear View Cardholder |
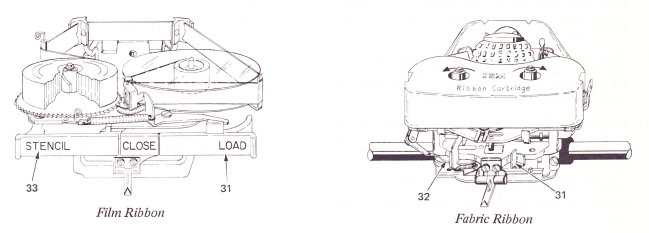
31. Ribbon Load Lever |
10. Shift Key |
21. Platen Variable |
32. Ribbon Lift Lever |
11. Multiple Character Key |
22. Multiple Copy Control Lever |
33. Stencil Control |
OPERATOR CONTROLS
1. Visual Inspection — Look at the machine carefully for loose, damaged or missing parts. Also look for foreign material in the machine: pencils, erasers, paper clips, etc. Before starting the functional check, note the present settings of the operator controls. The controls should be returned to these settings at the end of the functional check.
2. On-Off Switch — Operate the on-off switch (8) several times. Switch action should be positive and the machine should reliably turn on and off.
Turn the switch off. Try to depress all of the character keybuttons. All characters except the hyphen/underscore (12) should be locked. No character should print when the machine is turned back on.
Turn the switch on and unplug the machine. Depress all functional keys: tab (16), shift (10), spacebar (13), backspace (6), and carrier return (9). Plug the machine in. The machine should start reliably under this load.
3. Paper Insertion — Roll a single piece of paper into your machine. It should not wrinkle or be damaged.
4. Paper Release — Pull the paper bail (26) forward. Notice that the feed rolls still hold the paper tightly. Now, pull the paper release lever (29) forward. You should be able to easily position the paper left and right.
5. Multiple Copy Control Lever — Operate the multiple copy control lever (22) while observing the platen (27). The platen should move front and rear. The lever should not bind in
any position. Return the lever all the way forward.
6. Detent Release — Push the detent release lever (1) down. The platen should rotate freely. Push the detent release lever up. The platen should now be positively locked in position by the detent.
7. Platen Variable — Push in on the left platen knob (21). The platen should turn freely. Be sure the ratchet on the right side of the platen does not turn. When the knob is released, it should restore reliably.
8. Margin Set — Position the carrier at 30. Move the left margin (18) to the right until it lines up with the carrier pointer (4). Operate the carrier return. The margin should remain at 30. Type over to the right margin (5). The bell should ring 10-12 spaces before the carrier reaches the right margin. When the carrier pointer reaches the right margin, the character keys should lock.
9. Margin Release — Set the left margin at 25. Carrier return to the left margin: Depress and release the margin release lever (17). Operate the carrier return again. The carrier should move to the far left. Now type from zero to position 30. You should be able to type through the left margin.
CARRIER MOVEMENT
1. Spacebar — Return the carrier to the left margin. Check the spacebar by first typing a series of lowercase “n’s” separated by a space. Then, return to the margin, roll back to the same writing line and substitute a space for the “n’s” and the letter “x” for the space. You should have a line of alternate “n’s” and “x’s” evenly spaced.
Check to see that the spacebar repeats when slight additional pressure is applied to the keybutton. Starting at position zero, hold the spacebar in a repeat operation as you observe the carrier move to the right limit. The speed of the carrier should remain constant across the writing line.
2. Backspace — Turn the paper to the horizontal position and place it in the machine.Move the carrier to position 115 on the front scale. Type a series of 10 “h’s” and “n’s” (hnhnhn). Backspace 10 spaces and retype the same characters. The characters should overlap each other.
Also, perform this check with the carrier positioned at 10 and 60 on the front scale.
Check to see that the backspace mechanism repeats when slight additional pressure is applied to the keybutton.
3. Carrier Return — Operate the return key (9) with the carrier positioned two, three and four inches from the left margin. Check for reliable single and double line space during this operation.
Check to see that only the index part of the carrier return operation is repeated when slight additional pressure is applied to the keybutton.
4. Index — Operate the index key (7). Check for reliable single and repeat operation. The carrier should not move during an index operation.
5. Tab — Clear all tab stops (15). Now set tabs at 55, 56, 88 and 90. Operate the tab and check to see that the carrier stops exactly at 55, 56, 88 and 90. Make this check several times.
Now tab all the way to the right. Hold down the tab clear keybutton and operate the carrier return. All the set tab stops should clear automatically without excessive noise.
PRINT QUALITY
1. Strikeup — Set the impression control lever (25) at three. Type all the characters on the keyboard using the following procedure: type one character, then an “H”; another character and an “H,” etc., until you have typed every character in upper and lowercase. Do this several times. First, depress the keybuttons very slowly and evenly, then type fast. Remember, every operator types differently.You should meet the following conditions, no matter how you type.
a. All keys should have printed the correct character.
b. All characters should have even color.
c. No characters should type out of position.
d. There should be even spacing between characters with no overlap.
e. All keybuttons should move down easily and the correct character should print before the keybutton bottoms.
2. Repeat Characters — Lightly depress the hyphen/underscore keybutton. The character should print only one time when the keybutton is depressed. The character should repeat when more pressure is applied. You should not be able to stop the repeat operation by pushing down hard on the keybutton.
3. Impression Control — Type a letter character with the impression control lever at one and at five. You should hear a difference in the sound of the typehead (19) hitting the paper. Return the impression control lever to three.
4. Line Spacing — Type several lines of underscores in both line space lever (28) positions. The space between the typed lines should be even for both line space lever positions.
5. Scales — Type a line of uppercase “V’s.” The horizontal line on the cardholder (20) should be parallel to the line of “V’s.”
The points of the “V’s” should line up with the vertical lines on the cardholder.
Set the left margin as far to the left as it will go. Operate the carrier return. The pointer should line up with zero on the front scale (30).
6. Type alternate upper and lowercase “Z’s.” The characters should print properly with even spacing.
Slowly depress the shift lock (14). The button should lock down just as or slightly after a shift occurs.
Lock the shift in uppercase and type a full line of underscores. The lock should not release by vibration.
The shift should unlock when either shift button is lightly depressed.
7. Film Ribbon Operation — Look at the ribbon and the typed characters below. The pattern on the ribbon should look similar to this.

There should be neither character overlap on the ribbon nor voids (white spaces) on the printed characters. Depress the stencil control (33) and type a few underscores. The ribbon should not feed and the underscore should miss the ribbon. Return the stencil control to its normal position.
8. Fabric Ribbon Operation — Type a series of underscores with the impression control lever set on five and the ribbon lift lever (32) in the high lift position. Look at the position the underscore printed on the ribbon. It should be near the bottom and all underscores should print on the ribbon. If a black and red ribbon is used, all characters must print black when the ribbon lift lever is in the low lift position. All characters must print red when the lift lever is in the stencil position. When the lift lever is in the stencil position, the underscore must not print on the top of the ribbon.
Remove the ribbon cartridge. Depress the repeat underscore and note which ribbon feed ratchet is rotating. Turn the other feed ratchet in the same direction while depressing the repeat underscore. The ribbon mechanism must reverse and drive the opposite spool. Repeat the procedure for the other spool.
Reset the margins and tab stops as they were when you started.This completes the detailed function check.
FUNCTIONAL CHECK — IBM ”SELECTRIC" II TYPEWRITER
This functional check is designed to check the additional features found on the IBM “Selectric”ll Typewriter. Refer to the IBM “Selectric” Typewriter functional check for other machine functions.
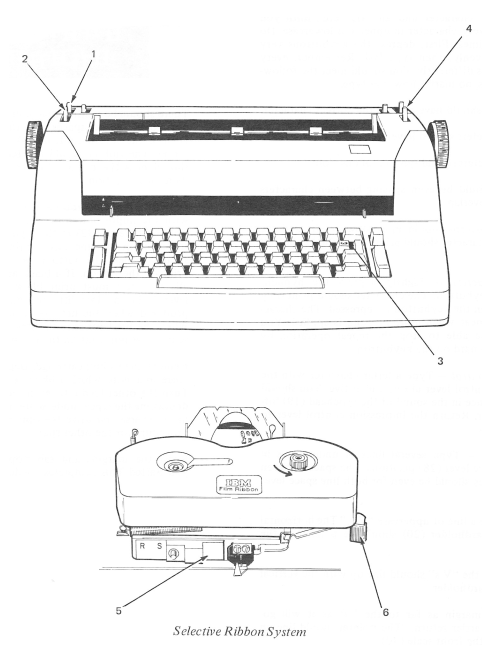
1. Switch Pitch Lever
2. Half Backspace Lever
3. Express Backspace Keybutton
4. Detent Release Lever
5. Stencil Lever
6. Ribbon Load Lever
OPERATOR CONTROLS
1. Switch Pitch Lever — The switch pitch lever changes the pitch of the machine between the 10 pitch mode and the 12 pitch mode.
2. Half Backspace Lever — The half backspace lever moves the carrier one half backspace to the left when the lever is held forward.
3. Express Backspace Keybutton — The express backspace keybutton moves the carrier quickly to the left when the keybutton is held depressed.
4. Detent Release Lever — This control performs the same function as on the “Selectric” Typewriter just its location is changed.
5. Stencil Lever — The stencil lever is moved right-to-left to place the ribbon mechanism in the ribbon or stencil mode.
6. Ribbon Load Lever — The ribbon load lever raises the ribbon lift guides and prepare the ribbon mechanism for changing the ribbon.
SWITCH PITCH/HALF BACKSPACE
l. Place the switch pitch lever in the 10 pitch mode (to the rear). With the margin set at zero, carrier return and type a row of letter “1’s” about two inches long.
2. Pull the switch pitch lever forward to the 12 pitch mode. Carrier return and type another row below the previous one. The machine changed pitch if the second row of characters does not align with the first row.
3. Return the machine to the 10 pitch mode and type a series of slashes (/). Backspace to the beginning of the slashes; then pull the half backspace lever forward. While holding the lever forward, type another series of slashes. This series of slashes should be evenly spaced between previously typed slashes.
DUAL PITCH TAB/ESCAPEMENT
1. Install a sheet of paper. Clear all tab stops and reset tabs at several locations across the writing line. Operate the tab from the margin and type a character at each stop. Repeat this procedure for three lines. The characters should line up in straight vertical columns.
Clear the tab stops and change pitch. Make the same check again after changing the pitch.
2. Now, tab all the way to the right. Hold down the tab clear keybutton and operate the carrier return. All the set tab stops should clear automatically without excessive noise.
3. With the carrier at the far right, depress the carrier return, then depress the tab. The tab operation should immediately override the carrier return.
4. With the carrier at the far left and all tab stops cleared, depress the tab, then carrier return. The carrier return should immediately override the tab.
ROTARY BACKSPACE/EXPRESS BACKSPACE
1. Turn the paper to the horizontal position and place it in your machine. Then, starting with the carrier at the left, type a row of “h’s” and “n’s” (hnhnhn) for a total of 10 characters. Now, backspace 10 spaces and type over. The characters should overlay each other. Make the check in both 10 pitch and 12 pitch mode.
2. Also check the backspace in a similar way with the carrier positioned in the center and toward the right of the writing line.
3. Check to see that the backspace mechanism repeats when slight additional pressure is applied to the keybutton.
4. Depress the express backspace keybutton. The carrier should move to the left as long as the keybutton is held depressed.
SELECTIVE RIBBON SYSTEM
1. Put a single sheet of bond paper in your machine. With the multiple copy control lever forward and the impression control lever on three, type all of the characters in upper and lowercase.
2. Inspect the copy for even color density of all the characters.
3. Inspect the copy for ribbon flaking; that is, ribbon particles on the copy.
4. With a film ribbon installed, the lift pattern should look like this example:
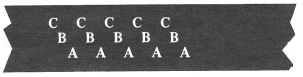
Inspect the ribbon pattern on the machine. The characters should not overlap one another and the characters should be positioned on the ribbon with a margin of safety at the top and bottom.
With a Tech III ribbon installed on the machine, inspect the ribbon pattern. The characters should overlap one another and there should be a margin of safety at the top and bottom of the ribbon. Type several lines of underscores. The typing must not fade.
5. Inspect the ribbon around the path at the various guides and rollers. There should be no wrinkles in the ribbon.
6. Finally, place the stencil control lever in the stencil position and type several characters. The ribbon should not feed or lift.
FUNCTIONAL CHECK - IBM CORRECTING "SELECTRIC"II TYPEWRITER
This functional check is designed to check the correcting mechanism on the IBM Correcting “Selectric” Typewriter. Refer to the IBM “Selectric” Typewriter or “Selectric” II Typewriter functional checks for other machine functions.
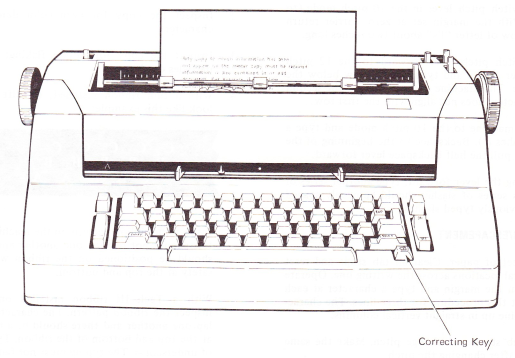
1. Type several characters, then depress the correcting keybutton. The carrier should backspace one time.
2. Retype the last character typed. The image must be completely removed from the paper or covered up, according to the type of correcting tape used, and the carrier must not escape.
3. Type another character. It should be in the same position as the original character and the carrier should escape normally.
4. Type several characters. Normal print and escapement should begin again.
5. Perform steps one through four again. The correcting tape should feed enough so that the characters on the correcting tape do not overlap.